Thursday, December 17, 2015

Tin Ornaments

Actually they are aluminum ornaments and we just can't stop making them. We did a workshop the other day at the Purple Twig creating these aluminum ornaments and we just can't stop making them. They are so sparkly and reflect the light beautifully on the tree or Hanukah bush. The options of patterns to create are endless. This project is so perfect for ages 7 and up. For those kids who love to use tools.


I ordered a roll of embossing aluminum from Blick Art but if you wanted to be really eco-friendly you could cut open soda or beer cans. I used paper punch to create the shapes.  I have read it sharpens your paper punches to cut aluminum. You could also cut out shapes like diamonds or an owl shape. 


I ordered some wooden tool kits but you could also use ballpoint pens that are not extended or skewers to "draw" your designs.


The trick is to use a small pile of newspaper to "draw" on. This soft surface allows for the aluminum to be embossed. You can work on the back and the front of each piece so that sometimes the mark is indented and sometimes embossed.
My daughter cut out an owl shape, then using the wooden tools to create the eyes and patterned feathers.


She used a nail to make a hole to string through a very thin wire. She added beads.


I can not tell you how happy these ornaments make me. Every time I look at our tree and all the aluminum shining away I am so proud 


I would love to see what patterns you come up with. Please email me an image if you do try this project. 

Thursday, December 10, 2015

Knee Bowls

We use clay in many ways at the Purple Twig, mostly we don't fire the clay with the younger ages. We use the pliability of the natural material to add sticks, pipe cleaners, cork and many other materials to create fairy houses, clay figures, forests and more. Clay is such an amazing sensory material for the kids. It strengthens hands. It's great for practicing fine motor skills by forming balls and coils. Some kids absolutely love it and some find the texture challenging. All good reasons to use it often.


Every once in a while I like to come up with a project for our Parent/Child class that is a complete fired project. Knee bowls is one of those projects. Ceramics can be frustrating for people because you have to wait and wait to see the results. You never quite know what it's going to look like until it comes out of the kiln from the glaze firing. It takes patience and a bit of faith. Those are some of the reasons I like to do fired projects. Also because they are gorgeous and are something that could potentially last a life time. It's quite a keepsake. They are also amazing presents to give to grandparents so I offer the project around the holidays. We use low-fire white clay.


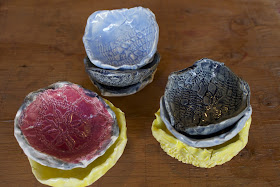
Knee bowls are exactly what they sound like. The kids and parents form balls of clay and we use rice paddles as our clay smackers (technical term). I have a lot of lace doilies from my grandmother and this is a perfect way to use them that I know she would definitely approve of if she were still alive. The child places the doily over the ball of clay and smacks it flat.


The process imprints the pattern from the doily into the clay creating a small clay pancake. 


The clay pancake then gets pressed onto the child's bent knee and you have a beautiful little bowl that is perfect for salt or rings or just for looking.


The following week the children glaze the bowls. I don't fire them first. I let them dry for a week so they will take the glaze. I just do the one firing after the glazing since they are not going to get heavy use and they are so small.