Purple Twig- Art Exploration for kids. A mom run small business in Los Angeles. Stop by to see the trials and tribulations.

Tuesday, December 31, 2013

Happy New Year's

When the school's are on vacation we get busy putting together an enriching curriculum for the kids who spend days with us during the camps. During winter break we put together a curriculum surrounding winter, whether it be fairy tales about winter like Persephone or making igloos or winter animals.
For our first day of camp we put together a celebration kit for NEW YEAR'S EVE. I really do love any excuse for a celebration and celebrations are even better with hand made accessories.


We painted show boxes and added some fabric to the bottom. We then filled it with the things we made throughout the day. We made celebration flags, noise makers, and party hats. 


Each project was fairly simple but really fun to put all together. We bought party hats at a dollar store. Took one apart and traced the shape onto paper. We gave the paper to the kids and they decorated them as they wished. After gluing the paper onto the hat form they then choose from different glittery garland  which we hot glued along the rim. They then glued some glittery pipe cleaners or plastic foliage in the top. Voila you have a hat to fit any party. 
The noise makers were also bought at the dollar store. We dissembled them to just the whistle part and added our own decorative paper fringe and feathers. 


After lunch we all went a noise maker parade through the neighborhood. It really was was a great way to celebrate. 


HAPPY NEW YEAR'S EVE!!!


Tuesday, December 24, 2013

Happy Holidays!!!


Spending the morning making paper snowflakes with my children is my idea of a wonderful day.

Happy Holidays to you and your families!!!!!

Wednesday, December 18, 2013

Sparkly Pinecones


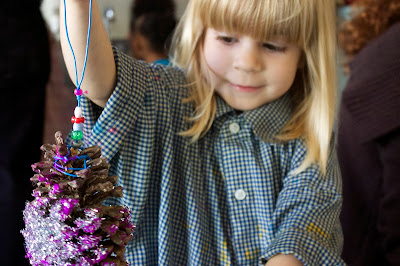
The curriculum for our  family classes for ages 2 and 3 being seasonal. I love coming up with ways for these little ones to create objects to bring cheer to the winter. I also use a lot of natural materials as art materials. That way kids find a connection between the world around them and creativity.  So this is what I came up with, hanging sparkly pinecones.


You'll need 
pine cones, which you can collect on walks.
paint of your choice
beads
colored wire ( I use twisteez)
glitter lots of glitter.


After twisting the colored wire around the first few seeds of the cone so that it will hang you can set the pine cone on a plastic plate ( I use these ones from Ikea for all kinds of projects). Give them paint of color of choice and let them go to town. It's a different type of exploration for kids to paint an object rather than on paper. 


After paint comes the glitter which I put in small cups for them to sprinkle and then it doesn't get too out of control. 


I then give them each a cup of beads so that they can bead onto the wire. It's much easier for this age to bead onto wire rather than string. It's great for eye-hand coordination as well as fine motor skills. They love talking about the different colors of beads as they choose them.


The result are these little sparkly tokens of winter to hang in windows or on the door to greet guests.


Happy Holidays!!


Sunday, December 8, 2013

Holiday Card Printing


I love the holiday season. I love the decorations.  I love the early darkness. I love the tree lightings. I love the cold. I even love the holiday music. Today we started off some celebrating by holding our first of many holiday workshops, holiday card printing. 


We used the foam printing process. It's such a simple process perfect for printing cards. You will need water-soluble printing ink, card stock, a brayer, printing foam or styrofoam, a pencil or sharp tool and a piece of plexi-glass, but plastic placemats will do as well. We first cut the printing foam to 4 X 5 inches. Then cut different colors of card stock 4.5 X 5.5. We give the kids short skewers to draw into the print foam. 


We then spread the ink on the plexi-glass. You can use the placemats for the ink. The kids love using the brayers to roll the ink on the pled-glass. Next spread the ink onto the print foam using the brayer.   When the ink has covered the entire foam image use a clean brayer to press the foam image onto the card stock ink side down and there you have it. 


We used a few different colors of ink as well as printed on a few different colors of paper. This made for many options for the kids. Each one displaying it's own individuality. Look at this sparkly silver snowman card. 


After the ink dried a bit we added some glitter. I really stressed to the children to use the glitter sparingly (which is incredibly hard to do). They did an amazing job of just adding a little embellishment.


I would be so excited to receive one of these beautiful cards in the mail. 


Happy Holidays!!!