Purple Twig- Art Exploration for kids. A mom run small business in Los Angeles. Stop by to see the trials and tribulations.

Thursday, December 17, 2015

Tin Ornaments

Actually they are aluminum ornaments and we just can't stop making them. We did a workshop the other day at the Purple Twig creating these aluminum ornaments and we just can't stop making them. They are so sparkly and reflect the light beautifully on the tree or Hanukah bush. The options of patterns to create are endless. This project is so perfect for ages 7 and up. For those kids who love to use tools.


I ordered a roll of embossing aluminum from Blick Art but if you wanted to be really eco-friendly you could cut open soda or beer cans. I used paper punch to create the shapes.  I have read it sharpens your paper punches to cut aluminum. You could also cut out shapes like diamonds or an owl shape. 


I ordered some wooden tool kits but you could also use ballpoint pens that are not extended or skewers to "draw" your designs.


The trick is to use a small pile of newspaper to "draw" on. This soft surface allows for the aluminum to be embossed. You can work on the back and the front of each piece so that sometimes the mark is indented and sometimes embossed.
My daughter cut out an owl shape, then using the wooden tools to create the eyes and patterned feathers.


She used a nail to make a hole to string through a very thin wire. She added beads.


I can not tell you how happy these ornaments make me. Every time I look at our tree and all the aluminum shining away I am so proud 


I would love to see what patterns you come up with. Please email me an image if you do try this project. 

Thursday, December 10, 2015

Knee Bowls

We use clay in many ways at the Purple Twig, mostly we don't fire the clay with the younger ages. We use the pliability of the natural material to add sticks, pipe cleaners, cork and many other materials to create fairy houses, clay figures, forests and more. Clay is such an amazing sensory material for the kids. It strengthens hands. It's great for practicing fine motor skills by forming balls and coils. Some kids absolutely love it and some find the texture challenging. All good reasons to use it often.


Every once in a while I like to come up with a project for our Parent/Child class that is a complete fired project. Knee bowls is one of those projects. Ceramics can be frustrating for people because you have to wait and wait to see the results. You never quite know what it's going to look like until it comes out of the kiln from the glaze firing. It takes patience and a bit of faith. Those are some of the reasons I like to do fired projects. Also because they are gorgeous and are something that could potentially last a life time. It's quite a keepsake. They are also amazing presents to give to grandparents so I offer the project around the holidays. We use low-fire white clay.


Knee bowls are exactly what they sound like. The kids and parents form balls of clay and we use rice paddles as our clay smackers (technical term). I have a lot of lace doilies from my grandmother and this is a perfect way to use them that I know she would definitely approve of if she were still alive. The child places the doily over the ball of clay and smacks it flat.


The process imprints the pattern from the doily into the clay creating a small clay pancake. 


The clay pancake then gets pressed onto the child's bent knee and you have a beautiful little bowl that is perfect for salt or rings or just for looking.


The following week the children glaze the bowls. I don't fire them first. I let them dry for a week so they will take the glaze. I just do the one firing after the glazing since they are not going to get heavy use and they are so small.


Friday, November 20, 2015

a conversation with Barbara Rucci

Barbara Rucci, who is the mastermind behind artbarblog.com is an incredible art teacher and has a wonderful way with watercolor paints. She has begun a new series on her blog of interviewing art educators. It was such a pleasure corresponding with her about running a business as well as classroom management.  It's so important for art educators to communicate with each other and share ideas. We are not alone out here trying to help children with creative thinking and problem solving, although sometimes it can feel like we are.

www.artbarblog.com


Please feel free to reach out if you have any thoughts or comments.

Monday, November 9, 2015

A Protection Spell


Our Potion and Spells class has been such a wonderful combination of history, botany, performance, chemistry as well as some self-realization. We have made ink from spices and other botanical elements. We have made candles to use in our spells. We have done some Shibori dying from Japan. We have created lip balm from the herbs we grow and gathered. And we have made the materials for ancient spells learned from the Gypsies of Bohemia. One of the aspects I didn't expect in this class was the calming effect of the collective ritual. When doing the spells together, the kids are participating in a performance and an experience together that is quite unique and sparks the ideas of magic in the world and where that magic comes from.


We prepare the materials needed for the spell, wrapping herbs, and painting the sacred ancient symbols on stones, which are found. While preparing the materials we discuss the ideas of magic and whether it exists and how it exists. One of the aspects about magic we have discussed together is by doing a spell for what they believe can deepen their conviction of their own beliefs. They each have the power to change things by making different choices for themselves.


This spell is a protection spell.
Rosemary is an herb that not only tastes good and is a great antiseptic but it represents remembrance and protection. We made bundles of rosemary to burn. We painted a protection symbol on rocks. The symbol combines the earth, fire, water and air signs within a triangle.


So here are all of our ingredients, a rosemary candle the kids made, the stone with the protection symbol, a rosemary bundle and some salt. Salt is used in spells for protection mainly because it's used as a preservative which was used to protect people from bacteria in food.
We also had a bowl of water in the center of our circle to douse the flames.


The kids wrote who or what they would like to protect on a piece of paper, folded it and placed it under their symbol. They then created a circle of salt around their paper. The kids spontaneously created the designs in the salt which was such a wonderful surprise.


They lit their rosemary bundle in their candles and blew them out. It filled the room with the scent of rosemary. They doused the rosemary and holding hands in a circle recited this incantation 3 times.

Rattle now, rattle clear
rattle far, rattle near
Protect this place and all within
keep away harm, away widdershin


They removed the paper from under the stone and lit the paper in the candle. After lit placing the paper in the bowl of water. 


The salt was then used to douse the flames in the water by sprinkling it onto the flames.

Every few weeks we are doing spells, spells for love, spells for healing and spells for knowledge. I do alter the spells I find to make it more experiential for the kids using the age the old symbols and herbs of magic. This class seeks to expanded their ideas of art combining the historical and the performative.


Monday, October 19, 2015

Scarariums


JOIN US FOR our SCARARIUM  workshop Next Saturday October 24th from 3-4pm. 

We will also be having a BOO BAKE SALE from 1-3pm outside the studio.

Stop by. Say Hi. Buy a delicious treat from a cute little ghost and make a scary terrarium (SCARARIUM) with us. 
Register at www.purpletwig.com.


Thursday, September 24, 2015

Collage Puppets


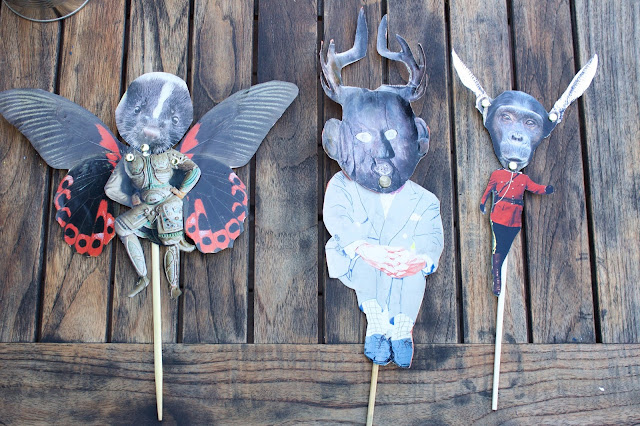
I love this playful use of collage. This project is far more conceptual rather than craft oriented. Listening to the children's ideas about the creatures and their creature powers is just so fun.
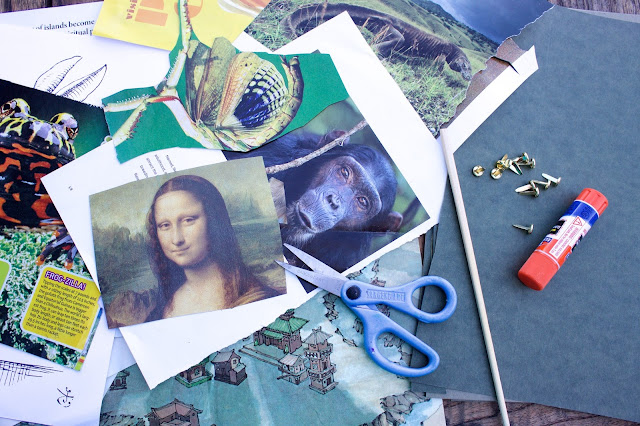

I start with a lot of images to choose from, images of animals, people ( I like to use people with costumes) and images of paintings and statues.  After choosing creature parts they just cut out all around the image and glue them down to card stock.


Then cut them out precisely. 


Punch holes where the body parts should be connected, add brass fasteners and a chop stick to the back with either hot glue or tape and Bob's your uncle.


Friday, September 4, 2015

Making SUSHI


This is an incredibly versatile clay project we did with children from ages 4 - 11 all sitting at the table working side by side each at their own skill level. We made sushi for hours with such an array of materials at the table. We had fabric, beads, rice, puff balls, little pieces of styrofoam, paper, some plastic leaves, glitter, plastic flowers, colored pasta. When setting up this project I slowly wandered through the studio looking for suitable materials, grabbing as many jars off the shelves as possible. I knew the more the kids had to choose from the better. Each student began with either a bento box made from a shoebox lid or with a sushi platter made from tongue depressors. 
With just a little bit of demonstration of flattening clay and rolling up fabrics inside as if it were seaweed, off the kids went, rolling, cutting, gluing, dipping, creating gorgeous and carefully designed little sculptures. They were getting ideas from each other and creating new ideas from the materials, beads as fish eggs, fabric as thin strips of carrot to wrap around a rice cake made from styrofoam, plastic leaves as salad. 
It was a glorious morning.